Categories
living green

Canning A Little Bit Greener

Reusable Canning Lids
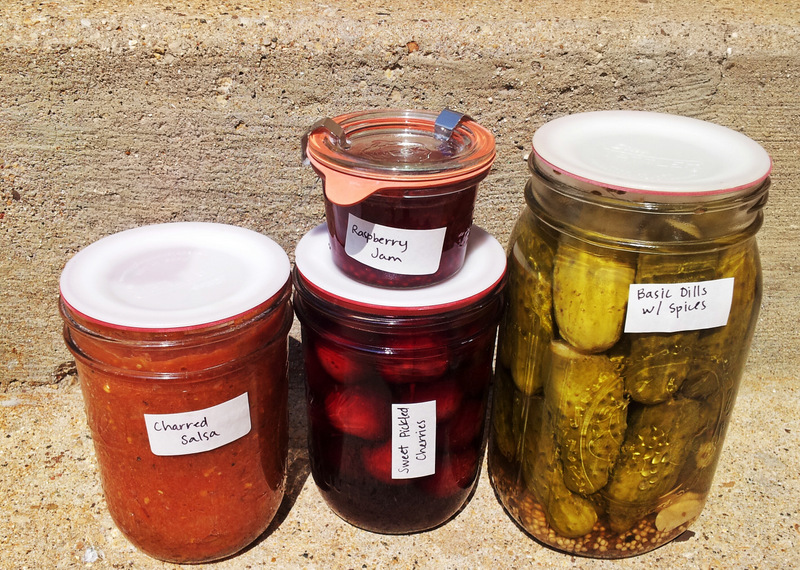
I’ve been a pretty serious canner for 3 or 4 years now, and don’t see myself stopping anytime soon. In fact, during the summer I’m continuously checking out my jar supply and trying to figure out if I’ll need to supplement this year. The answer always seems to be yes. My family loves pickles and salsa. We use crushed or diced tomatoes as a base for pizza sauce or in chili all winter. Applesauce made to the perfect consistency and with only 2 ingredients is a wonderful dinner side-dish in a pinch, and also makes a great grab and go for the last minute pot-luck. And I’ve started getting more into jams. Seriously, homemade raspberry jam is pretty much sublime.

And every year I find myself scrambling to make sure I have enough lids. I have rings coming out my ears, since those are reusable, but it kills me that I only get one use out of the standard ball canning lid. So I started looking into if there was a reusable option for the lids as well. It turns out there are a couple options to make my canning habit greener, at a range of prices.

Reusable Canning Lids

Le Parfait makes high end canning jars with hinge lids and rubber gaskets. These jars, or others like them are on my “someday” list. They come in a wide variety of sizes, including 2 and 3 liter sizes, which might be a little impractical for water bath canning, but would be excellent for holding fermented foods in the fridge or for storing dry goods.

Weck makes some gorgeous options. They come with a glass lid, a rubber gasket, and some metal clips to hold it all securely in place while canning. Most of what they offer seems to be primarily designed for jellies and jams – preserves that are well suited to smaller jars or tall and narrow jars. A good friend gave us a few jams in weck jars as part of a baby/new-parent gift, and not only were the jams delicious, but I’ve been smitten with the jars ever since.

What I ultimately decided to go with for now are these Tattler reusable canning lids. The lids are made of BPA free plastic, and come with rubber gaskets. They fit all the mason jars I already have and pair easily with all those rings I have lying around for canning. So far I love them, and it makes me so happy to know that I’ll get year after year of use out of them instead of one-and-done.

Do you have any household habits or hobbies that you’ve recently made greener?

This post contains affiliate links.

Categories
design energy

CFL Light Bulbs

CFL or compact fluorescent lamp light bulbs are pretty typical these days. A CFL bulb is made up of a ballast and a tube containing gas. The ballast turns the current from the wall outlet into high frequency current, which it sends into the gas tube. The high frequency current knocks excites electrons in the gas, causing them to produce ultraviolet (UV) light. When the UV light hits the fluorescent coating on the glass tube it produces visible light.

CFL light bulb
Light Bulb” by Pedro Lozano CCBY

Let’s compare CFL light bulbs directly to the pro and con list I put together last week about incandescent bulbs:

  • Light Quality: Mixed Reviews. The light quality can be all over the board with different brands of CFL light bulbs. We’ve grown accustomed to the warm, soft light produced by incandescent bulbs, and in comparison, some brands of CFL bulbs can produce cold, harsh light. However, many brands have improved their designs to provide warm light just like incandescent bulbs. You may have to shop around a couple brands to find the light quality that meets your expectations.
  • Price per bulb: Pro. While more expensive than filament bulbs, you can pick up CFL bulbs for around $2 per bulb.
  • Availability: Pro. You can get basic CFL bulbs pretty much everywhere you can get filament bulbs these days.
  • Style: Con. While CFLs fit pretty much any standard light bulb socket, you’ll have trouble finding specialty shaped bulbs of the CFL variety.
  • Energy use: Pro. A CFL bulb that produces a comparable amount of lumens as a 60 watt filament bulb requires only 14 watts.
  • Lifetime: Pro. 8000 hours! Which translates into about 7 years of burning for 3 hours a day.

And one more important point to consider when using CFL bulbs:

  • Toxicity and Disposal: Con. The gas inside the CFL tube contains mercury which is hazardous to come in contact with. This means you have to be careful not to break open the tube, and you really should not just be disposing of a CFL bulb in the trash. Used CFL bulbs should be disposed of by bringing them to an appropriate drop site for safe disposal.

If you’re looking for a disposal site near you, you can check out search.Earth911.com

So the tally when comparing CFLs to Incandescents is 4 pros, 2 cons, and 1 mixed review. Now let’s look at the long term cost.

10 year cost for burning filament bulbs in one lamp: (3 hours a day, $0.12/kwh cost of electricity, $2.00/bulb, 2 bulbs) = $22.40.

Pretty cheap when compared to the $96.84 it would cost to run the same light with a incandescent bulb.

Categories
apartment living living green

Simple Green Homemade Laundry Detergent

homemade laundry detergent
So we moved recently, and as is often the plague of the renter, we have found ourselves with a new pay-per-wash laundry situation. The washer in our building is your standard top loader, although its basin is slightly larger than standard. The way this washer is set up, you load it up with clothes and soap, close the lid, choose your settings, and hit start. Once you hit start the lid locks. And THEN the water starts. This means that you can’t start the water and put the soap in before loading, which allows you to start dissolving the powdered laundry detergent a little bit.

You may recall from my post on cloth diapers, that we’ve been using 1/4 cup liquid Dr. Bronner’s castile soap and 1/2 cup baking soda to do our wash. We used this combination successfully for 3 years at our last place. If you have a top loader where you can start dissolving the baking soda before loading all your clothes in, I totally recommend this as a detergent. The castile soap worked wonderfully for getting our clothes clean, and the baking soda softened the water and kept everything fresh smelling. And once you turn away from the heavily fragranced store-bought detergents, you’ll suddenly realize how overpowering those fragrances are.

However, with this new setup, without the ability to start dissolving the baking soda, we were finding baking soda deposits on all our laundry. It didn’t ruin anything, but white streaks on your dark clothes that are supposed to be clean is just no fun. So I decided to switch it up, and see if we could find a new homemade laundry detergent recipe that uses less baking soda. I was also interested in trying a detergent using bar soap instead of liquid soap, because the Dr. B’s bar soap is much cheaper than the liquid.

So after doing some googling, and reading some of our homesteading faves, I decided to try out a pretty simple recipe – washing soda and grated bar soap.

What is washing soda? you may ask. Well, it’s sodium carbonate – one less carbonate than sodium bicarbonate aka baking soda. And, you can make it pretty simply from baking soda. Washing soda is a good deodorizer and water softener, like baking soda, but it is also useful for stripping oil and wax. It is a bit of a harsher chemical than baking soda, so don’t ingest it and keep it out of little hands. Unless your a grown person with little hands… Use your best judgement. You can make washing soda by taking a few cups of baking soda, spreading them on a cookie sheet, and baking it in the oven at about 400 F for an hour. The heat causes a chemical reaction that releases water and carbon dioxide, turning your baking soda into washing soda.

homemade laundry detergent components

For the laundry detergent:
2 cups washing soda
1 bar (5 oz) castile soap

  1. Grate the soap with a cheese grater or in a food processor. At first I was like, maybe I should get a special grater just for the soap. But then I realized that this is the exact same soap that I use to wash my dishes, in bar form. So I just used my regular cheese grater. And I used the second smallest holes.
  2. Mix the now powdered soap with the washing soda. The washing soda is really fine, and you don’t really want to breathe it in, so to do this I put it all in a tuperware, put the lid on it, and shake it up.
  3. Washing soda can pretty easily absorb water and carbon dioxide from the air, which turns it back into baking soda. So store your laundry detergent in an air tight container. I just use the same tuperware that I mixed it up in.
  4. For the wash, use 2 heaping table-spoons for each load.

I’ve used this new homemade laundry detergent a handful of times already, and it’s passing the test so far. Our clothes are coming out clean and fresh, and no baking soda streaks! And it is definitely still powerful enough to get rid of the ammonia smell of wet diapers, even though I’m using so much less.


Categories
energy

Incandescent Light Bulbs

Shortly after we moved one of our lamps burnt out. The light bulb was the last of an old 6 pack of filament lights that we finally used up. For a while now, one of the items on our green living to-do list has been to upgrade to LED light bulbs, but since I already had that old pack of filament bulbs, we had to use those up first. Because one of our rules is use what you already have first.

So I ordered a 6 pack of LED lights. Maybe overkill considering we only have 2 lamps and these things have a 10 year guaranteed life. Real talk: sometimes I let the discount for buying in bulk counteract our desire to have less stuff. I need to work on that.

Anyhow, today I’m going to do a compare and contrast on the three most common types of light bulbs, so that next time you need to replace one, you can make the best choice.

Incandescent Light Bulbs

I mean, let’s hand it to Thomas Edison, this design for an electric light bulb has been around since 1878. Edison wasn’t the first to make a bulb that used a filament – about 20 others had done so with varying degrees of success starting in 1802 – but Edison’s design using a carbon filament had a long life and was the one that took off commercially. Filament lights work by passing an electric current through a material known as the filament. Today, filaments are typically made of tungsten.

Pros:

  • Light Quality: Incandescent light bulbs produce the warm, soft light we’ve come to expect from our lamps.
  • Price per bulb: Incandescent light bulbs typically cost about $1 – $2 per bulb
  • Availability and style: You can easily pick up a filament light bulb at a grocery store, convenience store or hardware store. And you can get a wide variety of sizes and styles. If you have a chandelier that takes specially shaped bulbs, they are most likely going to be Incandescent light bulbs.

Cons:

  • Energy use: A standard 60 watt incandescnet light bulb produces anywhere from 600-800 lumens. Lumens are the unit that the amount of visible light is measured in. As suggested, to do this it takes 60 watts of electricity flowing through the filament. Newer, more efficient filament bulbs claim to produce the same amount of lumens using about 45 watts, but that is still significantly more energy than other light bulbs require.
  • Fragility: Filaments are rather delicate things. If jostled too strongly, the filament can get dislodged or break without even being lit.
  • Lifetime: A 60 watt bulb will burn for about 985 hours. This translates to around 11 months of use if lit for 3 hours each day.

10 year cost for burning incandescent light bulbs in one lamp: (3 hours a day, $0.12/kwh cost of electricity, $1.50/bulb, 12 bulbs) = $96.84

You can find my report of the pros and cons of CFL light bulbs here, and LED light bulbs here to see how Incandescent light bulbs measure up.

Categories
living green

Cloth Diapers: 10 weeks – 5 months

Cheeks just hit 5 months this past week. This means we have about 150 days of cloth diapering experience under our belts. We’re hardly experts, but I do think we’re doing cloth diapers in a fairly minimalist, as green as possible, way. And in the interest of sharing how we live green, I wanted to share what we do.

cloth diapering

Background

Since every baby is different, and thus every family’s cloth diapering needs will be a bit different, I’ll start out with a little bit of background on Cheeks. He was a bigger babe from the onset, weighing in at 8 lbs. 14 oz. He wore newborn size clothes and diapers for 2 weeks at most. He is currently crushing the scale at 17 lbs 9 oz.

For the first 10 weeks or so we had a diaper service that provided clean pre-folds for us every week. We used our own wraps, so our process has remained pretty much the same. (I highly recommend this if you can make it work – cheaper than disposables, all of the benefits of cloth diapers, and no responsibility for washing and drying. Diaper services also do their washing and drying in bulk, which uses even less water resources than washing your own!)

So far Cheeks is still only eating breastmilk, so he’s not having solid poops yet. Our process might change once other food is in the mix. He has a poopy day about every 3 days or so, when he might produce 3-5 dirty diapers. In between poopy days he just wets.

Diapers, Covers and Wipes

cloth diapers and supplies

We use unbleached, organic cotton prefolds. Currently we have 12 infant size (12”x16”) prefolds and 24 standard regular (14.5”x20.5”) prefolds. The infant size is a bit thicker, and fit Cheeks as is. The standard regular size is a bit thinner, and since they are much longer, we double over the front to make them a thicker and to make them the right length.

We currently use Thirsties size 1 covers with snaps. We have 6 covers, and we love them. The tag on the size 1 says up to 18 lbs, but we probably have a bit longer than that before we need to get the size 2s.

We buy our diapers and covers through Diaper Safari.

We slip the corners of the prefolds into the corners of the covers, slip them under Cheeks’ bum, fold the front of the prefold around his legs, and snap the cover together around him. Then we make sure everything is tucked into the cover around his legs, and we’re good to go.

folding cloth diapers

For wipes, we cut up a bunch of old cotton t-shirts into rags, and just use water for clean up. We originally thought we would use a mild soapy soak for the wipes, but when Cheeks was born, the hospital just had us use washcloths and water, so we decided no need for any soap.

Washing and Drying

With 36 diapers and 6 covers, at 5 months of age we can typically go 2-3 days before we run out and need to do laundry. When we change Cheeks, the diaper, any wipes we use, and the cover (if necessary) go into a 5 gallon bucket with a lid. Conveniently, after about 2-3 days it is also full, so that’s the signal that we need to do laundry.

Right now, since the dirty diapers aren’t so bad, we wash the diapers, wipes, and covers, mixed in with our regular laundry. The diapers, etc. don’t make a full load, so we just fill up the washer with whatever else needs to be washed. We haven’t had any trouble with staining or stinking. We set the washer to cool water and a regular cycle.

We use the same laundry detergent for all our laundry – diapers included. For each load we use 1/4 cup of castile soap (Dr. Bronner’s is our personal choice), and ½ cup of baking soda. This works great at getting our laundry clean, fragrance free, and doesn’t include any additives that could build up on the diapers and cause diaper rash or problems with absorbency.

line drying cloth diapers

We line dry everything. In the summer our diapers (even the thickest ones) are dry in a few hours of sun, and the sun naturally bleaches any stains that may not have come out in the wash. Before we moved and had access to an outdoor clothes line, we hung our diapers on a drying rack indoors, and it took about 18-20 hours for them to dry out.


So, that’s how we do cloth diapering at 5 months. I’ll keep you updated if our process changes as Cheeks starts eating solid foods in the next few months.

This post contains affiliate links

Categories
building design energy

About LEED certification

Have you ever walked into a building that has a LEED certified sticker on its door and wondered what exactly that means? Well, today I’m going to give an overview on LEED certification.

What is LEED

LEED, or Leader in Energy and Efficiency Design, is a certification program for buildings. The program was designed by the US Green Building Council (USGBC), and provides a rating system that certifies how environmentally friendly a building design is.

What can be LEED certified

The building can be certified in terms of design, construction, or operation. Neighborhoods and homes can be certified as well. In fact there are five different certifications based on the type of project:

  1. Building Design and Construction
  2. Interior Design and Construction
  3. Building Operations and Maintenance
  4. Neighborhood Development
  5. Homes

New construction, remodels and already existing buildings can LEED certified.

What is the LEED certification based on

Certification is based on the number of points that a building project earns in evaluations. Projects are scored out of 100 possible points. The points are earned across 6 categories: sustainable sites, water efficiency, energy and atmosphere, materials and resources, indoor environmental quality, and innovation in design. A building that earns 40-49 points is Certified, 50-59 points is Silver, 60-79 points is Gold, ad 80+ points is Platinum.

How does a building get LEED certification

First of all, in order to be LEED certified, a building or building project needs to apply for evaluation – The USGBC isn’t just going around to all the buildings and evaluating them willy nilly, it is an opt in certification that demonstrates the owner, and the architect, designer, and construction team’s dedication to green and sustainable building. When a building project has applied for certification the team then pursues various objectives in the 6 categories in order to earn points.  Credential holders who are trained in the LEED certification categories and goals perform an evaluation of the project throughout the building process, and submit the scores for certification.

Categories
building design

Passive Water Heaters

The last topic I’m going to cover in this series on passive design is passive water use. Heating water consumes a considerable chunk of the energy that the typical house uses, so if you can cut your active water heating it can pay off both in terms of cutting energy use and cutting your bills.

While passive solar water heating systems are less efficient than their active counterparts, they tend to be cheaper, reliable, and long lasting. There are two basic types of passive water heaters, the integral collector-storage passive system or a thermosyphon system.

Integral Collector-Storage  (ICS) Passive Water Heater

An ICS system works best in more moderate climates, where the temperature rarely falls below freezing.  The ICS system has exposed pipes, so above freezing temperatures are necessary to keep the pipes from freezing and ruining the system.  The ICS system is made up of an insulated storage tank, a solar collection tank and the pipes that connect them. The solar collection tank is used to heat water in batches using solar energy. Once heated, the water passes into the insulated storage tank, and cool water fills the solar collection tank again.

Thermosyphon Passive Water Heater

A thermosyphon consists of a tank, pipes and a solar circulator. In this case instead of the sun heating a large tank of water, the sun heats winding pipes of water. Cool water flows from the high positioned tank into the lower circulator where it is heated. Warm water flows from the circulator back into the tank due to natural convection caused by the temperature gradient.  An indirect thermosyphon that uses glycol fluid in the circulator loop can be used in colder climates if the piping is adequately insulated.

If you’re interested in building your own passive water heater, you can find some good information here.

photo: “Solar Water Heater boiler” by gmourits CCBY


Categories
apartment living living green

Settling in after Moving to Madison

Since moving to Madison 8 weeks ago, I think we finally have all our ducks in a row. We have new bank accounts, our mail is successfully forwarded, and we’ve fallen into a bit of a routine once again. Now that we’re a bit more familiar with our surroundings, I thought I would share a few of those green-living-to-dos that were on our list.

Compost

Around 35 million tons of food waste ends up in landfills every year. And while some of it does break down and get captured as methane, most of it, tied up in non-breathing plastic bags, just sits there. As I’ve mentioned before, composting is super important to me. So finding a way to compost our food waste is always on the top of my to-do list when we move.  Folks, we got lucky this time. One of the other apartment dwellers already had a compost bin set up in our backyard, so we’ve been able to share with them.  They also have a small garden plot in the yard, so they will be happy to reap the benefits of the compost pile we’re helping them build.

Energy

Madison Gas and Electric has a green power program, very similar to some of these energy companies, where for an additional 2.5 cents per kwh, we can purchase matching renewable energy for all the energy we use. MG&E’s green power is supplied by wind farms all across Wisconsin and Iowa.  When we started our service with MG&E we took a couple minutes on their website to find their green power tomorrow program and sign up for it.

Groceries

We prefer to buy as many of our dry goods in bulk as possible to reduce packaging. Unfortunately, the closest grocery stores to us do not have bulk bins. Whole foods does, but they tend to be a bit limited for our tastes. Luckily there is a food coop that is right on our way to and from the community garden that has extensive bulk bins. And, as a bonus, they mark down their produce that needs to be used right away. I think it’s pretty rad to see what they have in the marked down produce section and figure out if I could turn it into dinner for us that night or the next. We’ve also taken time to visit a number of local farmers markets and farm stands.  There are a number that are in walking distance almost every day of the week.